Air Fryer Green Beans: 10 Secrets for Crispy Perfection Every Time
There’s a special kind of disappointment that comes with limp, soggy green beans that taste like nothing but sad vegetables. After buying fresh produce with good intentions and spending time preparing them, ending up with a pile of flavorless strings feels like a complete waste of effort and groceries.
The struggle with green beans is universal. They either come out undercooked and squeaky, overcooked and mushy, or somehow both at once—raw in the middle with burnt tips. Getting that perfect balance of tender-crisp texture with actual flavor seems to require restaurant equipment or culinary school training.
Here’s the reality: air fryer green beans can absolutely achieve restaurant-quality results with the right approach. This isn’t about complicated techniques or expensive ingredients. It’s about understanding how these vegetables respond to dry heat and making strategic decisions about preparation, seasoning, and timing.
These ten secrets unlock the potential hiding in those fresh green beans sitting in the crisper drawer, transforming a boring vegetable obligation into a side dish people actually get excited about eating.
1. Fresh Beats Frozen (But Frozen Can Still Win)
The fresh versus frozen debate for green beans in air fryer recipes isn’t as simple as fresh always wins. Each option has advantages depending on the situation and desired outcome.
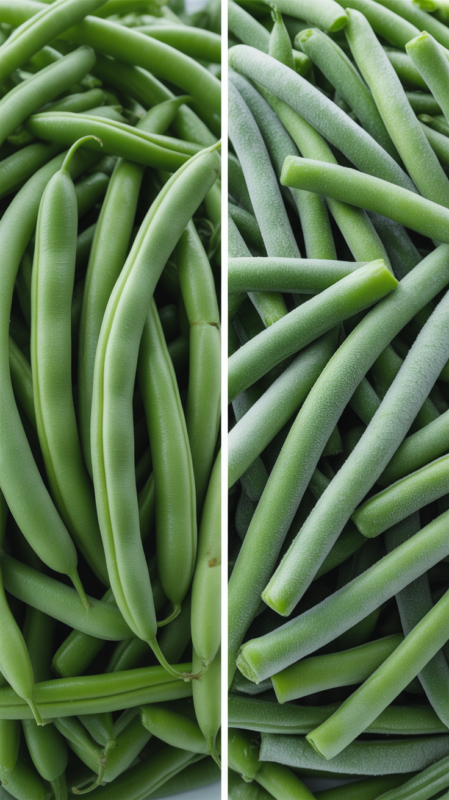
Fresh green beans deliver superior texture and flavor when prepared correctly. They stay tender-crisp with satisfying snap, and their natural sweetness shines through minimal seasoning. The bright green color looks appealing on the plate, and they hold up better to high heat without turning mushy.
Frozen green beans air fryer preparations work surprisingly well when time and convenience matter most. They’re pre-trimmed and ready to go, eliminating the tedious prep work. The blanching that happens before freezing actually helps them cook more evenly in the air fryer.
The key with frozen green beans air fryer recipes is moisture management. Spread them on a towel to thaw for 15-20 minutes, then pat completely dry. The excess ice crystals create steam that prevents crisping. Without proper drying, they’ll never achieve the crispy edges that make this cooking method special.
French green beans (haricots verts) are thinner and more delicate than standard green beans. They cook faster and develop more surface area for crisping. If using these, reduce cooking time by 2-3 minutes to prevent overcooking.
For green bean fries variations—where beans get breaded and treated like actual fries—fresh beans work better. Their sturdier structure holds breading without falling apart. Frozen beans are too delicate for heavy coatings.
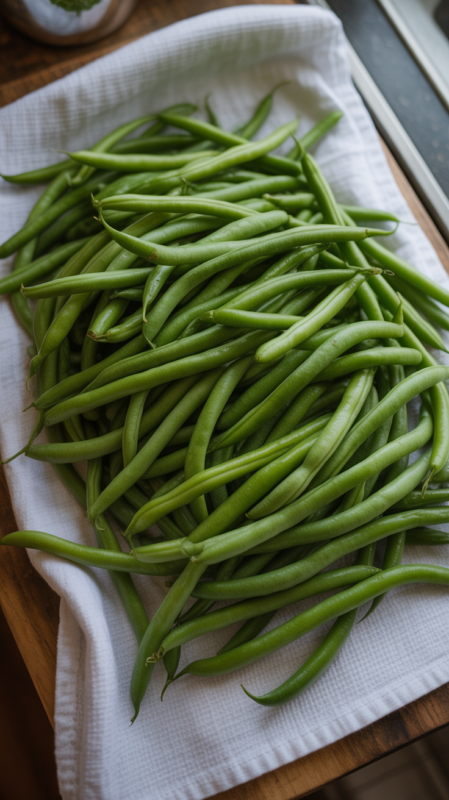
Quality matters regardless of fresh or frozen. Look for bright green color without brown spots or yellowing. Fresh beans should snap cleanly when bent. Frozen beans should be loose in the bag, not frozen in a solid block which indicates thawing and refreezing.
2. Trim and Size Consistency Changes Everything
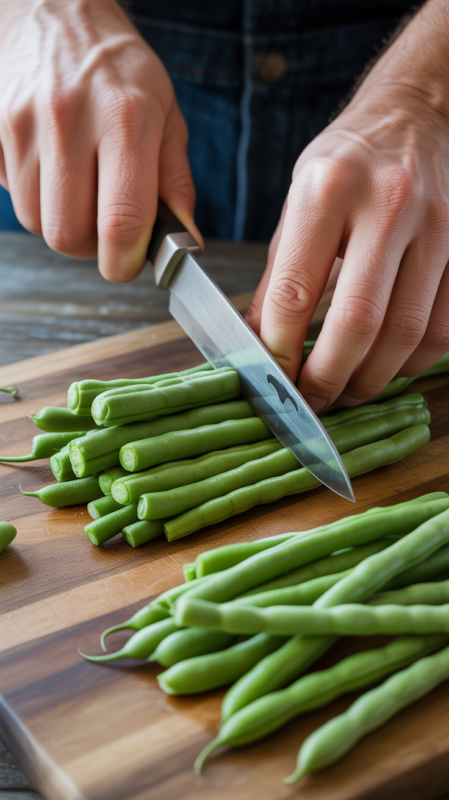
Uneven green beans mean uneven cooking, which creates the frustrating combination of burnt ends and raw middles. Taking a few extra minutes to prep properly pays massive dividends in final results.
Snap or cut off both ends of fresh green beans. The stem end is woody and unpleasant, while the opposite end often has a stringy tip. Some people leave the pointed end on for aesthetics, but removing both ends ensures consistent texture throughout.
Size matters more than most cooks realize. Beans longer than four inches take longer to cook through. Beans shorter than two inches burn before developing flavor. The sweet spot sits at three to four inches long for even cooking in the standard air fryer green beans recipe timing.
Sort through the beans before trimming. Put similar sizes together and trim accordingly. The fattest beans might need an extra minute of cooking, while the thinnest ones finish faster. Cooking them separately by size produces better results than mixing everything and hoping for the best.
A sharp knife makes this job infinitely easier. Line up several beans at once and trim the ends with one cut. This batch trimming technique speeds up what otherwise feels like endless prep work. A dull knife crushes rather than cuts, damaging the beans and creating uneven edges.
For meal prep situations, trim beans ahead and store in an airtight container with a damp paper towel. They stay fresh for three to four days, turning weeknight cooking into a five-minute process. The time investment happens once rather than every single night.
Some cooks swear by snapping beans by hand rather than cutting them. The irregular breaks supposedly create more surface area for seasoning to stick. It’s not wrong, just slower. Either method works fine as long as sizing stays consistent.
3. The Drying Step Is Non-Negotiable
Moisture on the surface of green beans creates steam instead of the dry heat needed for crisping. This single step makes the difference between crispy air fryer green beans and soggy disappointments that taste boiled.
After washing fresh green beans, shake off excess water vigorously. Spread them on a clean kitchen towel in a single layer and let them air dry for 10-15 minutes. Rolling them in the towel and pressing gently speeds the process without bruising the vegetables.
A salad spinner works remarkably well for this task. Spin the beans multiple times, dumping the collected water between spins. The centrifugal force pulls water out of all those tiny crevices better than hand drying.
Paper towels work in a pinch but aren’t as effective as cloth towels. They tend to stick to the beans and leave behind little paper bits. If using paper towels, choose high-quality ones that don’t disintegrate when wet.
For frozen green beans air fryer preparations, drying becomes even more critical. Those ice crystals harbor way more moisture than a simple rinse. Pat them absolutely dry, then let them sit on towels for a few minutes to allow surface moisture to evaporate.
The beans should feel dry to the touch before adding oil and seasonings. If they feel damp or cold, give them more time. Rushing this step guarantees mediocre results no matter how perfect everything else is.
Some cooks use a hair dryer on cool setting to speed drying after washing. It sounds excessive but works remarkably well for impatient chefs. The moving air evaporates surface moisture in minutes rather than the 10-15 minutes of passive air drying.
4. Oil and Seasoning Technique Makes or Breaks Flavor
Simply tossing green beans with oil and dumping on garlic powder doesn’t create the flavor-packed results possible with proper technique. Strategic seasoning builds layers of taste that make these vegetables actually crave-worthy.
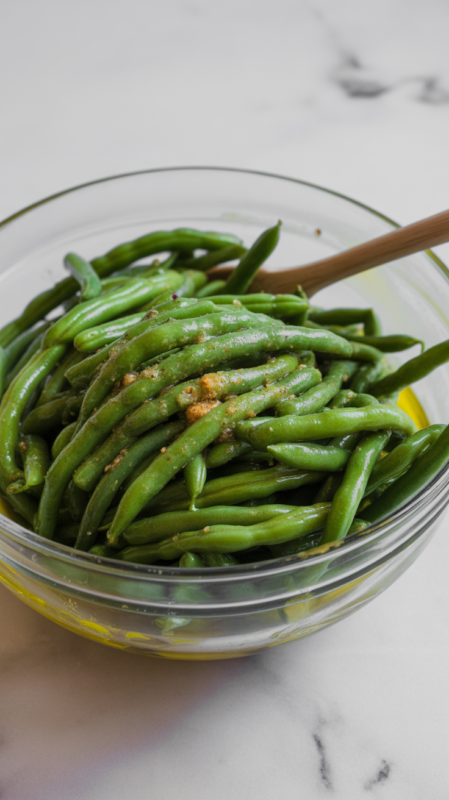
Start with dry beans in a large bowl. Drizzle olive oil in a thin stream while tossing continuously with your hands or a spoon. This distributes oil evenly so every bean gets coated without any swimming in excess. About one tablespoon per pound of beans is the right ratio.
After oil application, add seasonings and toss again. The oil helps seasonings stick rather than falling through the air fryer basket onto the bottom. Salt, black pepper, and garlic powder form the flavor foundation. Add them generously—vegetables need more seasoning than most people realize.
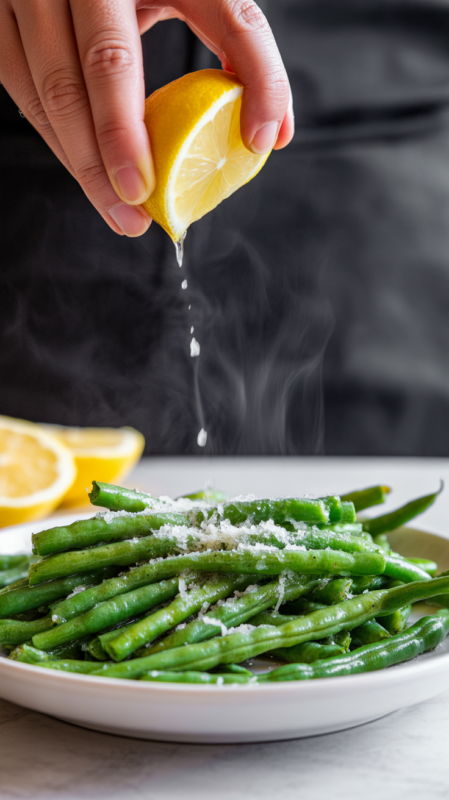
For air fryer green beans with parmesan or air fryer parmesan green beans variations, add the cheese after cooking rather than before. Parmesan cheese burns easily at 400°F. Toss hot beans with grated Parmesan immediately after removing from the basket so the residual heat melts it slightly without burning.
Red pepper flakes add subtle heat that wakes up taste buds without overwhelming. A quarter teaspoon provides gentle warmth while half a teaspoon brings noticeable kick. Adjust based on personal preference and who’s eating.
Lemon zest in the seasoning mix creates brightness that complements the earthy beans. Add the actual fresh lemon juice after cooking to maintain crispy texture. Acid added before cooking creates moisture that prevents proper crisping.
For air fryer green beans asian style variations, skip the Italian seasonings and use sesame oil instead of olive oil. Add soy sauce, ginger powder, and a touch of honey after cooking. Garnish with sesame seeds for authentic flavor and crunch.
5. Temperature and Timing Sweet Spot
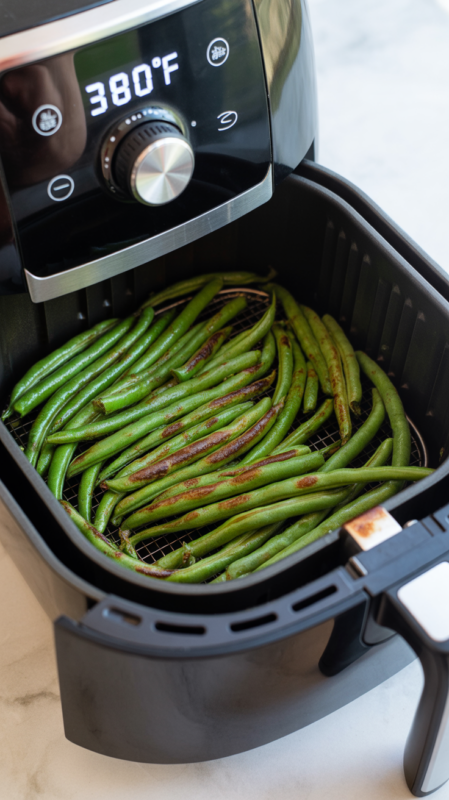
Setting the air fryer to 380°F for 10-12 minutes creates the perfect balance between crispy exterior and tender interior. This temperature is hot enough to develop color and char without incinerating the beans before they cook through.
Preheat the air fryer for three minutes before adding beans. Starting with a hot basket ensures immediate crisping rather than gradual heating that can make beans soggy. This small step makes a measurable difference in final texture.
Fresh green beans need 10-12 minutes at 380°F, shaking the air fryer basket at the halfway point. The shake redistributes beans and ensures even browning on all sides. Frozen green beans air fryer cooking requires 12-14 minutes to account for extra moisture.
Visual cues matter more than arbitrary timing. Beans should have brown spots and slightly shriveled tips when done. The color shifts from bright green to deeper green with golden-brown charred areas. These char marks provide concentrated flavor that makes the whole dish special.
Different air fryer models vary in intensity. The first time making this green beans recipe air fryer style, check at the minimum time and add more as needed. Some models run hot and finish in 8-9 minutes. Others need the full 12-13 minutes. Make notes for future reference.
For air fryer green beans crispy texture, push the timing toward the longer end. An extra minute or two creates more char and crunch. For those who prefer tender beans with minimal crisp, pull them at the earlier time. Personal preference guides the final decision.
Avoid opening the air fryer basket repeatedly to check progress. Each opening releases heat and extends cooking time. Trust the process, check once at the halfway shake, and check again near the end of cooking time.
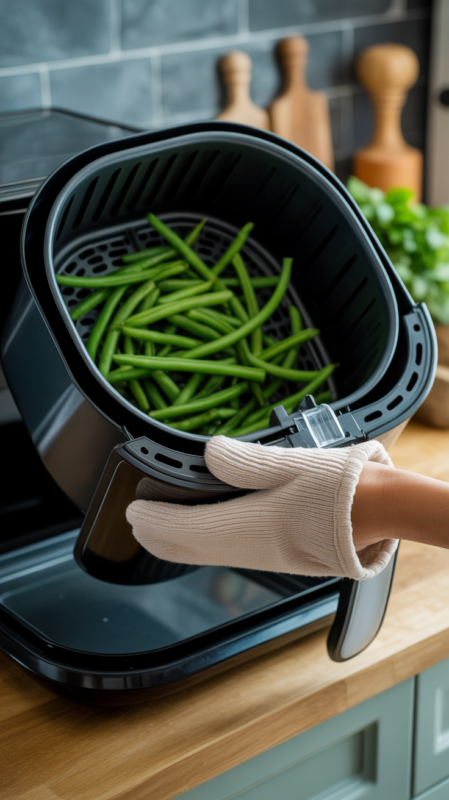
6. Single Layer Rule (Yes, It Actually Matters)
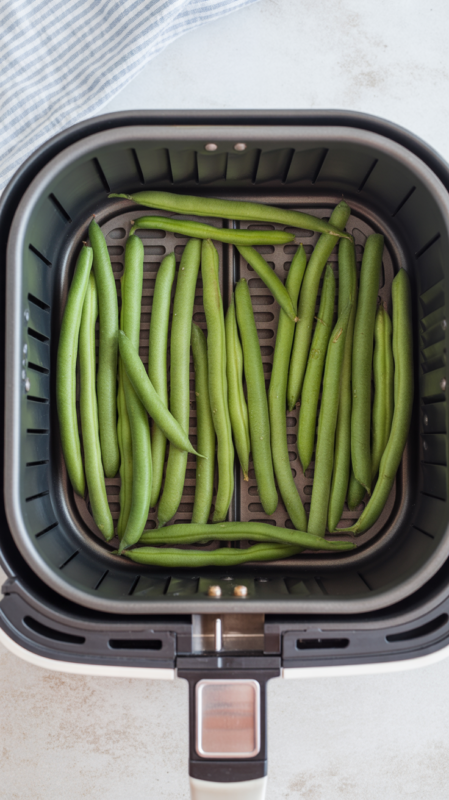
Piling green beans high in the air fryer basket creates steamed vegetables instead of crispy ones. Air needs to circulate around each bean for proper crisping and even cooking.
Arrange beans in a single layer with minimal overlap. Some touching is inevitable and acceptable, but avoid stacking them in multiple layers. Most standard air fryers comfortably hold about one pound of green beans in a proper single layer.
For larger quantities, cook in batches rather than overcrowding. The second batch takes 10-12 minutes, barely longer than stuffing everything in at once and getting inconsistent results. The quality improvement justifies the minimal time investment.
The air fryer basket size determines serving capacity. A 3.5-quart basket handles one pound of beans comfortably. Larger 5-6 quart models can manage 1.5 pounds. Smaller 2-quart versions might only accommodate half a pound without overcrowding.
Shaking the basket halfway through cooking redistributes beans and prevents bottom pieces from steaming while top pieces burn. Use oven mitts and give the basket several good shakes to flip and move beans around. This simple action dramatically improves consistency.
For meal prep cooking multiple pounds at once, the batch cooking method works best. Keep finished batches warm in a 200°F oven while subsequent batches cook. They maintain texture surprisingly well and everything stays hot for serving.
Some air fryer models have tiered racks for cooking multiple layers simultaneously. These work better for foods that don’t need constant air circulation. For green beans specifically, the single-layer approach in the main basket produces superior results.
7. The Shake Technique Perfected
The halfway shake isn’t optional—it’s essential for even cooking and consistent browning. This simple action separates mediocre results from restaurant-quality sides.
Set a timer for half the cooking time. When it sounds, remove the air fryer basket and shake it vigorously several times. The goal is redistributing beans so different surfaces contact the hot basket, ensuring even char development.
Don’t just give it one gentle shake. Aggressive shaking flips beans multiple times, creating new hot spots and preventing any single area from burning. Use oven mitts because the basket is hot, and shake with confidence.
Some cooks prefer using tongs to stir beans rather than shaking. This works fine but takes longer and doesn’t redistribute as thoroughly. Shaking moves everything simultaneously while tongs require careful stirring to reach all pieces.
For extra crispy results, shake twice during cooking—once at the five-minute mark and again at eight minutes. The additional redistribution creates more evenly browned beans with consistent texture throughout the batch.
If adding parmesan cheese or other toppings partway through cooking, do it after the final shake during the last two minutes. This prevents burning while still allowing flavors to meld.
The shake also serves as an opportunity to check progress. If beans look like they’re browning too quickly, reduce temperature by 20 degrees for the remaining time. If they’re barely colored, increase temperature slightly or extend cooking time.
8. Finishing Touches That Elevate Everything
Air fryer green beans taste good straight from the basket, but strategic finishing touches transform them from good to unforgettable. These final additions add complexity and polish that rival restaurant preparations.
Fresh lemon juice squeezed over hot beans immediately after cooking adds brightness that cuts through any oil and brings vegetables to life. The acid balances the char and makes every bite interesting. Use fresh lemon juice rather than bottled for best flavor.
Flaky sea salt sprinkled on just before serving provides textural contrast and flavor bursts. Regular salt dissolves and distributes evenly during cooking, but finishing salt creates little pockets of intense saltiness that make taste buds pay attention.
Toasted almonds or pine nuts add richness and crunch. Chop them roughly and scatter over finished beans for textural variety. The nuts provide healthy fats and make the dish feel more substantial.
Grated parmesan cheese remains the classic finishing touch for air fryer green beans parmesan style. The cheese melts slightly from residual heat, creating a savory coating. Add it generously—vegetables can handle strong flavors.
For garlic air fryer green beans variations, add minced fresh garlic during the last two minutes of cooking. Raw garlic added at the start burns and turns bitter. Adding it near the end provides potent garlic flavor without acrid burned taste.
Balsamic glaze drizzled artistically over plated beans creates visual appeal and tangy sweetness. The reduction is thick enough not to make beans soggy while adding sophisticated flavor. A little goes a long way—too much overwhelms the vegetables.
9. Storage and Reheating Without Sogginess
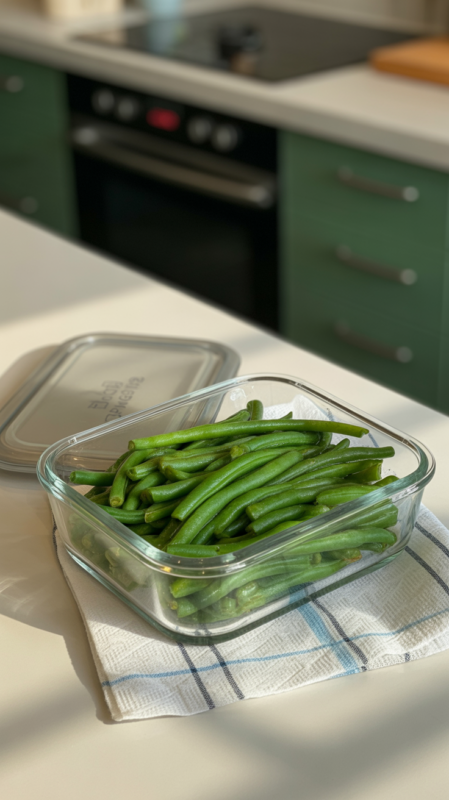
Properly stored air fryer green beans maintain quality for three to four days in the refrigerator. This makes batch cooking practical for meal prep situations.
Cool cooked beans completely before storing. Placing warm vegetables in an airtight container creates condensation that turns crispy beans soggy overnight. Spread them on a plate for 15 minutes to release heat before transferring to storage.
Store in an airtight container with a paper towel on the bottom to absorb any residual moisture. The paper towel keeps beans drier and helps maintain texture better than storing without it.
Reheating in the air fryer at 350°F for 3-4 minutes resurrects most of the original crispiness. This method is infinitely superior to the microwave, which turns beans rubbery and limp. The dry heat re-crisps the exterior while warming the interior.
Add a tiny drizzle of fresh olive oil before reheating to refresh the coating. A light spray of cooking spray works too. This minimal added fat helps crisp the surface during reheating.
For meal prep efficiency, portion beans into individual containers with other meal components. They pair beautifully with proteins like chicken, steak, or salmon. Having sides ready to reheat makes weeknight dinners effortless.
Freezing cooked green beans doesn’t work well. They turn mushy and lose texture during thawing. If meal prepping, stick with refrigeration for up to four days rather than attempting to freeze finished beans.
10. Variation Ideas to Prevent Boredom
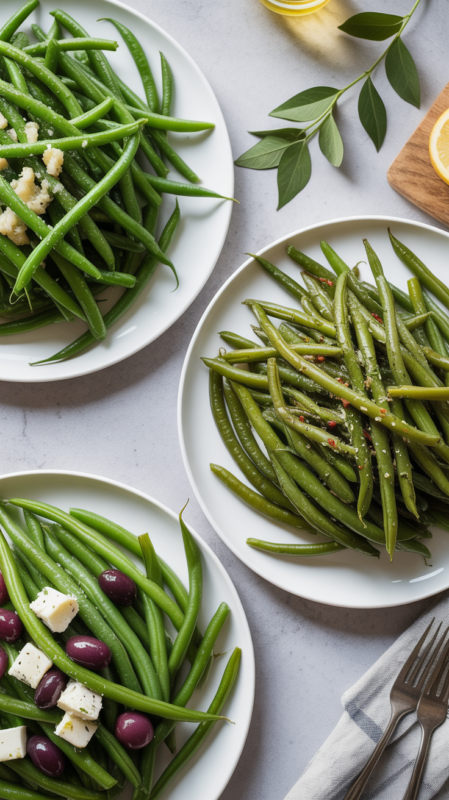
The basic air fryer green beans recipe serves as a foundation for endless variations. Small changes prevent flavor fatigue while maintaining the convenience and simplicity of the core method.
Mediterranean style incorporates sun-dried tomatoes, kalamata olives, and crumbled feta cheese. Toss these additions with hot beans after cooking for a Greek-inspired side that transports taste buds across the ocean.
Asian-inspired versions use sesame oil, soy sauce, rice vinegar, and sesame seeds. Add a pinch of ginger powder during seasoning and finish with sliced green onions. The umami-rich flavors create completely different taste experience from Italian-style preparations.
For air fryer fried green beans with breading, coat beans in beaten egg then panko breadcrumbs before air frying. Cook at 400°F for 8-10 minutes, shaking halfway. The breaded version creates green bean fries that work as appetizers or unique side dishes.
Bacon lovers can crumble cooked bacon over finished beans along with a drizzle of the bacon fat. The smoky, salty pork amplifies the vegetable’s natural sweetness. This indulgent variation turns vegetables into something guests request specifically.
For air fryer green beans and potatoes combination, cut baby potatoes into quarters and cook them for 10 minutes before adding the green beans. Continue cooking both together for an additional 10 minutes. This creates a complete side dish in one basket.
Spicy variations incorporate cayenne pepper, hot sauce, or sriracha in the seasoning mix. For maximum heat, toss finished beans in hot sauce mixed with butter for buffalo-style green beans that rival any sports bar appetizer.
The Simple Truth About Perfect Green Beans
Mastering air fryer green beans isn’t about complicated culinary techniques or expensive ingredients. It’s about understanding how vegetables respond to dry heat and making strategic decisions about preparation, moisture management, seasoning, and timing.
This side dish solves multiple kitchen problems simultaneously. It’s fast enough for weeknight dinners, healthy enough to feel good about serving regularly, and delicious enough that people actually finish their vegetables. The hands-off cooking method means attention can focus on the main course while the air fryer handles the side.
The versatility keeps this recipe in regular rotation. Monday might feature classic garlic air fryer green beans. Wednesday could bring Asian-inspired sesame variations. Friday might add bacon and potatoes for heartier fare. Same basic method, completely different flavor profiles.
These ten secrets work together to eliminate the guesswork and inconsistency that usually accompanies vegetable cooking. No more limp beans. No more bland flavor. No more wondering why restaurant sides taste better despite using similar ingredients.
The next time a side dish needs to happen quickly without sacrificing quality, this healthy air fryer green beans approach delivers. Those fresh green beans in the crisper drawer or that bag of frozen beans in the freezer are all that stands between right now and restaurant-quality results.
The ingredients are simple, the technique is straightforward, and the results speak loudly enough to convert even vegetable skeptics at the dinner table. Time to prove that green beans can be the side dish everyone actually wants to eat rather than the obligation they push around the plate.